Tuesday, August 20, 2013

Oops!!! The chicks hatched...

Was inspired by one of the bakers who has been doing this a few times.... Has also asked her for the recipe, but she just refused to share out... Well, maybe she is doing business that is why she refused to share it out...
So, I googled again, well, it's actually sponge cake in the egg shell.... Simple... I have it... The only problem is how to have so many egg shells???? Well, I have my way too... Collected 12 yesterday... Washed, boiled and freeze... Done and ready to use...
So, there it is.... For recipe, pls refer to my vanilla sponge cake recipe...

Happy baking....

My very very first handmade snowskin mooncake

Have been buying mooncakes every year... In singapore, nice mooncakes are always very expensive and too sweet for my taste.. Since I have been baking for a period of time, so I decided to try it on my own.... Ermmm..... Trying it on my own???? A very BIG challenge for me...  Google around for recipes, make sure buying the correct ingredients also a challenge.... Well, I always like challenge, I believe I can make it... I did it...
Ingredients :

(A)
95g Fried Glutinous Flour / Gao Fen (糕粉)
100g icing sugar

(B)
155ml of cold water (or any juices)

(C)
15g shortening

(D)
450g lotus paste
Some melon seeds, toasted (optional)

Method :
Toast melon seeds and leave it to cool.
Mix melon seeds with lotus paste and divide into portions of 25g each.
Mix ingredient (A) and (B) to form a dough.
Rub in shortening till get smooth dough.
Sprinkle some fried glutinous flour on working table.
Divide dough to portions of 20g each.
Wrap lotus paste with dough, till into a ball.
Lightly flour the mould.
Place mooncake in mould, flatten, dislodge the mooncake.
Chill in fridge before serving...

Happy making....

Friday, August 9, 2013

Topo Love Map Cake

Was reading some recipe recently, found that this recipe looks simple and the design of the cake is nice... 

After cutting the cake, you can see the line of the cocoa powder formed like the line of the map... Very very nice...

See the line?  It really looks like the map.... Very unique... The texture is so much softer than normal butter cake.... It taste yummy too....


Recipe of the cake

Ingredients : 
250gm butter
250gm sugar
5 medium eggs
300gm cake flour +1 tsp baking powder
125ml evaporated milk
1 tsp vanilla extract
1 tsp pandan paste
Cocoa powder for creating the topo lines (I used approximately 3 Tbsp)

Method : 
1. Cream butter and sugar until pale and fluffy.
2. Beat in eggs, one by one, beating well after each addition.
3. Sift half the flour into the butter mixture and beat on low speed until well combined.
4. Mix in the evaporated milk until well combined.
5. Sift the balance of flour into the mixture and beat on low speed until combined.
6. Divide the batter to two. Mix vanilla extract to one part and pandan paste to the other.
7. Preheat oven to 160(fan)/180C. Prepare a 8 inch pan, lined at the base.
8. Spread 1/2 the pandan batter (or vanilla whichever you prefer) into pan. Level it. 
9. Evenly sift a thin layer of cocoa powder over.
10. Very very gently dollop half of the other colour over and gently level it. Repeat the sifting of cocoa powder.
11. Repeat layering with both colours, with the final layer clean (no cocoa powder on top).
12. Bake for 45 minutes or until toothpick comes out clean.

Monday, July 29, 2013

Successful sponge cake

I think I have mastered the skill in baking sponge cake. 1 time done collapsed, 2 time done slightly collapsed and this time, didn't collapsed at all.... Yippee!!! I have master it very well... This is really what it called "practice makes prefect." 

Requested by my girl again, she wanted something to bring to school the next day, she actually requested some sponge cupcakes which I baked last week.  I wanted to try again on my pan sponge cake, so I decided to bake a whole sponge cake instead.


Adopted the recipe from "nasilemaklover.blogspot.sg" I tried her vanilla sponge cake.. Here are her ingredient and method...

Vanilla Sponge Cake香草海绵蛋糕
(recipe source: by Sonia aka Nasi Lemak Lover)
*makes a 8”(width) x 3” (height) cake pan with removable bottom


5 egg yolks
25g sugar
1tsp vanilla extract
85g water
65g corn oil
135g Top flour (high ratio flour) or cake flour


5 egg whites
90g sugar
1/2tsp cream of Tartar


Method
1. Prepare one 8” round cake tin (Not a non-stick), Do not need to line paper at all.
2. Immediate separate cold eggs from fridge (easy to separate this way) into two clean mixing bowls. Set aside to return to room temperature.
3. Add in sugar into egg yolks, immediately lightly whisk the egg yolks and sugar till light (Try to whisk immediately once sugar is added into egg yolks, egg will cover the sugar and turned hard if sit there for too long).
4. Add in vanilla extract and corn oil, mix well. Then add in water, stir well to combine.
5. Sift in flour, stir till well combined.
6. Whisk egg whites and cream of tartar till foamy, gradually add in sugar in there batches and continue beat until approaching stiff peaks (meringue stand straight up with a little curve at the tip) or till stiff peaks (this stage is a bit difficult to fold with egg yolk mixture)
7.Take 1/3 of meringue and use a hand whisk to mix well with egg yolk batter.
8.Fold in 1/3 of meringue and use a silicone spatula, gently fold with egg yolk batter till slightly combined. Fold in the balance meringue and gently fold till well combined.
9. Pour into the cake tin, bake at pre-heated oven at 140C (no fan) for 25mins at low rack, then increase to 160C(fan forced) for another 40mins.
10.Once baked, turn your sponge cake upside down and cool completely before remove from the cake pan (Finished cake size is 8” x 2.5”).


Wednesday, July 24, 2013

Clear Water Cake ( Sponge Cakes in Cups)

Managed to squeeze out a little time for myself to bake some cakes for the kids at home... Wanted to do something very simple, was flipping thru some recipes online, found this recipe from "thelittleteochew.com" very interesting and decided to try it out today...

The cake is so soft and surprising, it didn't really sinks that much compare to my previous sponge cake... The method and recipe is actually the same... (I'm still wondering why the previous sponge cake sinks that much)

The cake will actually separate from the cups when it's cool down... It didn't sinks still... After like 20mins, it still maintains the same.... Yes!!!! I made it...

This is one of the last 3 made on the second tray... With some chocolate chips on it... Cute right???!!!!

Recipe & method as follow : -

Recipe : 

(A)
- 3 eggs yolks
- 1 whole egg
- 50g corn oil (I used vegetable oil)

(B)
- 50g cake flour (I used top flour)

(C)
- 3 egg whites 

(D)
- 50g sugar 
- Dash of salt (I omitted)

Method : -

1.  Beat (A) till well with an egg beater. 
2.  Shift in (B), mix well.
3.  Whisk (C) till fronthy, add (D) and beat till stiff peaks.
4.  Fold in the egg white mixture to egg yolk mixture in 3 additions, mix well till well combined.  
5.  Scoop the batter into the paper cups till 60% full.
6.  Bake in preheated oven at 150'c for about 18-20mins.


Happy Baking....

Friday, July 19, 2013

My very first Sponge Cake

Every time I saw someone bake a sponge cake so successfully, I envious so much... I have been wanting to bake a sponge cake for so long, but just didn't really have the courage to do it cause baking sponge cake is really a test.

On Thursday, I finally have the courage to bake it... The aroma of the cake while baking is so nice and you can actually smell it from far.  When baking, I was so happy because the cake rinse so high and I really see the cake beautifully bake.

When the cake is ready, I leave it to cool and before I can do anything, it shrink.... I didn't know what to do, so I decided to slice into 2 and spread some cream with peach chunks... And it become  another "birthday cake".... The texture of the cake is really soft and fine... I will try it again one of these day... Wish me luck the next time...


Wednesday, July 17, 2013

Rainbow cookies

IWas so so busy helping up in the family business recently... Been working from morning till at least 9pm at night... I am really very tired to bake... All I know is to sleep and rest the moment I have time...

Starting from 14 July, my gal will be very busy with her "o" level preparations and she has to stay in school for night lessons till 9pm... As promised, if I have the time, I'll still bake and also bring her dinner...  

Inspired by the "flour box" recipe, I tried baking "Rainbow Cookies"... 
It suppose to be like this, but I failed stacking it up layer by layer, and I mixed all the colours up and it cut into flower shape using cookies cutter... And it become like this : 
Aren't they beautiful??? Become the sugar level was a bit too low, I decided to put a piece of chocolate chips on top to decorate it, at the same time, it will be slightly sweeter... The texture of the cookies are so crispy... My kids love it so much... 

Will try again next time when I'm free... Recipe as follow :

Ingredients : 

(A)
320g of butter ( room temperature)
180g of icing sugar
1 egg

(B)
440g of flour
40g of cornflour
30g of milk 

(C)
1/2 tsp each of the color
Rose pink
Violet blue
Egg yellow
Green

Method:
1. Combine ingredient (A) and beat till smooth.  Mixed in ingredient (B) and form into a dough.

2. Divide dough into 4 portions.  Colour each portion with different color from ingredient (C)

3. Place each portion of the dough between 2 plastic sheets and roll in it out flat.  Chill dough in fridge for 20mins.

4. Remove plastic sheets and stack the chilled dough on top of another.  Roll out the stacked dough slightly.

5. Cut the stacked dough into four parts and stack one on top of another again.  Roll out lightly.  Cut into long strips.  Cover with cling film and chill in the fridge till firm.

6.  Slice chilled dough into thin slice and bake in a preheated oven of 150'c for 20-25 mins or till well baked.

Friday, July 12, 2013

Oreo Cupcakes

Made some Oreo cupcakes for the kids since I have little time spend with them recently.... Sheena requested some as her friend also order a few from her....

Was referring some Oreo cupcakes recipes online and found my version Oreo cupcakes too simple.... So decided to make something special...
These are the one before baking.... It's actually a slice of Oreo biscuits below and another slice with the cream on top... Since the biscuits comes with creams, I cut down the sugar level from the original recipe by "Mimi bakery house"... I like her recipe because she use lesser sugar and also the texture of her cakes are softer.... 

Ingredients : (original recipe)
Butter : 120g
Sugar : 130g (I used 110g)
Eggs : 3
Self raising flour : 200g (I used 200g of super grade fine flour & 1/2tsp of baking soda)
Baking powder : 1/2tsp
Milk : 60ml
Oreo biscuits : 100g ( crushed, with creams)
I added 1/2tsp of vanilla essence, and 1 drop of "brown" coloring.... 

Method : 

Preheat the oven at 180 degree Celsius.

Cream the butter & sugar until white and creamy.  Add in the eggs one at a time, beating well after each addition.

Add in the milk, vanilla essence and the brown coloring and mix well, follow by the flour in 3 portions.  Lastly, fold in the Oreo crumbs.

Open up the Oreo biscuits, put the side without the cream at the bottom of the paper cup, scoop in the batter into the paper cups about 80% full and press the other side of the Oreo biscuits with cream onto the batter.

Bake it for 25-30mins or until golden brown.


See the outcome??? Sheena said the cake is so nice, the cream is like melt into the cake like sugar frosting, and the Oreo on the top and bottom is so crispy and the crushed Oreo is so crunchy... 

Try it... It is definitely a nice cupcakes...

(FYI : my cakes are lesser in sugar coz my kids and hubby don't like sweet stuff)


Resduced sugar Rainbow cake

Omg!!! I made it this time.... I really made it...
My girl celebrated her 16th birthday party at Safra Jurong BBQ pit.  She requested a "Rainbow Cake" for her birthday.  I made a trial one few weeks back, but it was way too sweet for the family.  This time, I cut down the sugar level for about 25g per layer, in all, 6 layers, I cut down about 150g of sugar for the whole cut... 
The cake is really nice, I decorated with some "Smarties Chocolate" and some "Rainbow Rice"... Whipping cream also cut down to thinner layer, the cake is really much healthier on the sugar compare to bakery found outside.... 
Oops!!! I changed the rainbow color position with the yellow and green... Suppose to be yellow first then green... A careless mistake....

I made it... Thanks to Cynthia Lim from "The Baking Biatch" recipe that I adopted from it, and he guidance from her too... 

Thanks...

Friday, June 21, 2013

Kueh Dahlia aka Daisy Biscuits

Didn't really bake a lot this week because of the horrible haze... Wasn't breathing well enough as I am asthmatic, but I realized that actually if I just sit down and do nothing, I feel more breathless and also restless.  So, even with a super heavy haze today, I got up of my chair and bake... In fact, when I make myself busy with baking, I feel better... So, if you are asthmatic, as long as your asthma does not attack you, you should not be just sitting there and do nothing, get yourself busy, and you will feel better...

My hubby was complaining there isn't any "snacks" for him to eat when he watches soccer at night... So I decided to bake something very simple and I believe not only he will eats, the kids will also finish it in no time..

Kueh Dahlia, or Daisy Biscuits are actually very popular during the Hari Raya, normally the Malays will either bake or order this cookies for the festival.. 
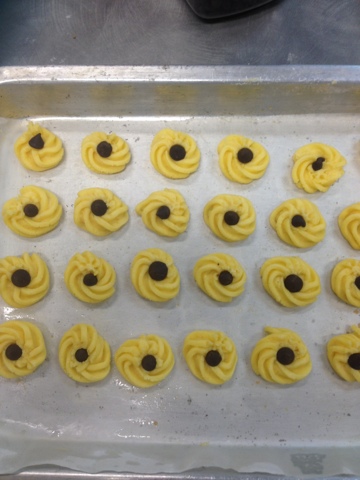
Before baking... Instead of using cherries, I used chocolate chips (I forgotten to get any cherries from the supermarket :p) 
Using the "pump" that I bought from JB, the pump is a challenge, coz the pump is small, and it is very stiff, I have to use my "bull strength" to pump each flower.. Hubby says I should buy a butter cookies presser next time for this cookies... Yah!!! I have a sponsor for that.... 

After baking... The texture is so soft yet crispy... It really melts in your mouth... I baked about 60 of it (the recipe is for 40, but I made smaller).. Before baking, I thought its enough for hubby 2 nights supplies for his soccer snacks, after baking, I realized it looks like very little,,, I told him I'm going to bake the second batch, but he says no need, its enough for him....

The moment I reached home, before the match, at 10pm... All gone.... Well......

Anyway, I'll bake again next week... More this time.....

Adopted the recipe from cornercafe.wordpress.com/

[Ingredients]
170g (6 oz) butter, softened
105g (3.75 oz) caster sugar, sifted
1 egg yolk
1/2 teaspoon vanilla extract
170g (6 oz) cake flour, sifted
85g (3 oz) custard powder, sifted

5 or more red glacé cherries

[Preparation]
1. Preheat oven to 170°C. Have the butter very soft almost at the verge of melting but not melted; in winter cold weather, place butter in the microwave at its lowest setting and heat at 30 second-interval until the required consistency. Cut each glacé cherry into 8 tiny pieces.
2. Beat butter and sugar until pale and creamy. Beat in egg yolk and vanilla. Lastly fold in flour and custard powder until a soft but stiff dough formed.
3. Transfer dough into a piping bag fitted with a 2cm star nozzle. Pipe out daisy shapes about 5cm wide each. Place a tiny cut cherry in the middle of each flower.

4. Bake for about 15 minutes, or until firm; don’t let the biscuits brown too much.

5. Remove from oven and let cool before storing in airtight container.


Friday, June 14, 2013

Special color for my rainbow cake

16 June is my dad's 63rd birthday.... I was trying to do something special for him this year as he is someone who is not fancy with sweet cakes... Went thru a few recipes online... Found this "Rainbow Cake" interesting and very challenging... So, I decided to bake him a "Rainbow Cake" for his birthday... Did a trial one which wasn't that successful because of sugar wasn't really well controlled (too sweet)...
This one, the trial one... Too sweet & lesser layers... 

His actual one... Sweetness not so, but still have to cut down a bit more... 
Know what??? My dad ate the cake... In fact, every year during his birthday, we bought from the bakery, he will only either eats the fruits or just the chocolate on top of the cake... But this time, he ate 1 BIG slice of "Rainbow Cake"... 1 BIG slice... He said nice and the sugar level is acceptable.... My hubby says sugar still high, must cut down more.... 

I'm so happy... I can bake my very own birthday cake, still, I have to master more on the frosting and the decorations skills.... My next cake will be my girl's 16th birthday party cake on 29 June... Same, she requested "Rainbow Cake"... This time will be must bigger... I really have to keep my fingers cross... Wish me luck everyone...


Friday, June 7, 2013

My very own chocolate twist loaf

TGIF.... It's Friday... Yes.... 

Using my last sachet of yeast left in the cabinet... No more buns for the time being... (Been baking a lot of buns recently)... This time, I try loaf bread.... Plain loaf too boring... Left a bit of chocolate powder, use up la.... Plain chocolate?  Chocolate powder not enough also??? Aiyah!!! Twist it and can have both plain and chocolate.... 


When I was rolling the dough, the work was tough.... The dough tends to bounce back and I have to use alot of strength to widen it... After a few rounds of rolling, I cut into 3 portions to pleat it like my gal's hair... Let it rinse the 3 round....  Put to bake and it become like this...

See??!!!  Taste is good and the bread is so fine and soft.... Don't need to spread anything on it and it taste perfectly well... 

Ingredient :

Tangzhong of 25g of flour & 125ml of milk

375g bread flour
100g flour
35g milk powder (omitted as use milk)
75g castor sugar (use a bit more for sweet taste)
3/4 tsp of salt (omitted)
1 sachet of yeast
1 egg (lightly beaten)
150ml warm milk
40g butter


Thursday, June 6, 2013

Up to date now...

I was very pissed of with this friend whom I know for more than 20 yrs last night... Reason??? I don't feel like saying coz I think it's not worth for me to mention her here... 

After a night sleep, I have decided to bake again to make myself happy..... Some of you may use exercise to make yourself happy, some may eat a lot of junk food.... Some even went shopping to spend alot of money to buy branded goods to make themselves happy... Me?? Bake... I will feel very happy to make myself happy... Real happy...

I made tuna buns today, using the same tangzhong method and chunks tuna... The outcome is still the same... Soft... I have been falling in love to bake bread nowadays....

Roti boy or Roti mummy

Went thru some bread recipes online, came across something call roti boy coffee buns.... At first I thought it is going to be something only a bakery chef can do it... Well... After reading thru at few times (I wasn't that hardworking when I was in school), I tried it out.... 

Using Owl 3in1 white coffee for the top and I may say, I passed... Again, with my 3 kids + 1(hubby) at home, it finished off before the next day... 


Tangzhong method bread making

PTo go further, I tried using tangzhong method to bake my bread this time.... It's a special method to make my bread even softer and finer...

Tangzhong :
25g of flour
125ml of water / milk
Put to heat for boil and reach 65 degree... Or thicken the paste...

Ingredient for the above amount of tangzhong :

375g bread flour
100g flour
35g milk powder (omitted as use milk)
75g castor sugar (use a bit more for sweet taste)
3/4 tsp of salt (omitted)
1 sachet of yeast
1 egg (lightly beaten)
150ml warm milk
40g butter


Bread - normal method (sausage buns & chicken ham buns)

I'm not that adventures, but enjoy going further and further for my baking...

Alot of people says bread making is not easy especially using bare hands to knead the dough... I agree, but that didn't stop me from trying... The first attempt of bread making was kinda of failed... (Didn't use enough of strength to knead and time used was short)... I didn't give up... I try again this time, I used longer time to knead the dough... Not only longer time, I also use stronger strength to throw the dough and knead with 2 hands... (That was tired... Really tired)... Hahahahaaa!!! I succeed.... And it finished in no time.... 

Cookies Monster in Action

My daughter has been asking when am I going to bake cookies for her... I remember the last time I bake was when she was just about 5 years old... (That was more than 10 yrs ago)...

Tried out both chocolate and butter cookies... 
Verdict : 
Chocolate cookies : melts in your mouth..
Butter cookies : can be improve...

Ingredient :

Butter
Sugar
Flour
Vanilla essence
Egg
Baking powder
Chocolate powder (chocolate cookies)
Chocolate chips (optional)

Wednesday, June 5, 2013

Chicken pie

Since I can make egg tarts... Of course, making chicken pie is not an issue....

The same pastry I used for egg tarts, using the same mould and same way...

Ingredient :
Pastry
Eggs
Butter
Flour
Sugar (Juz a bit)

Fillings :
Chicken 
Black peppers
Peppers
Sasame oil
Onions
Salt

Indonesia Gado Gado

Have been craving gado gado for a very long time... 

Many years back, when my late father in law was still healthily working (that was more than 10 yrs back), he will definitely buy me a packet of Gado Gado from the old hill's street hawker centre.... I heard from my late father in law saying that the stall owner was from Indonesia, that is why his Gado Gado is so authentic... 

Now, if you need to find someone who sell as nice as the old Hill's Street Stall is so difficult.... So, instead of finding high and low, I decided to make my own Gado Gado.... It taste the same... And all of us enjoy....


Custard tart vs Egg tarts

LFather taught me how make egg tarts... But his version of egg tart is custard tart... I don't like custard at all, so are my kids... He keeps saying egg tart is something very difficult... Not easy to manage and do... I don't believe it... I tried out on my own... 


See the difference between the custard tart and egg tarts??? 
Custard tart look nice, but taste : :(
Egg tart look ok, but taste : :)


Chocolate chips banana cake

OWho don't like banana??? (My girl hate banana)... Banana is my favorite... Always has left over banana after prayer... Before I started baking, banana will always left for days and mosquitoes flying into the house... Now... No banana were left for more than 2 days after prayer...

Made this 2 weeks ago... The banana day...

Chocolate chipa Banana cake
Ingredients :

Banana 
Flour
Baking soda
Sugar
Eggs
Vanilla essence 
Milk

Banana balls
Ingredients :

Banana
Flour
Eggs
Baking soda


Honeycomb cake

We went Parkway Parade for shopping one Saturday... There is this shop selling all kinds of cakes from Indonesia... The lady from the shop told us their cakes are "freshly" flew in from Medan, Indonesia...  "Freshly" flew in??? How to be fresh when it takes a few hours of flight and what about checking in??? How fresh is their fresh????   This inspire me to bake my very own honeycomb cake the next day...

See it?  Very "comb" and it works so well... So this is really fresh...

Mixed fruit cake

Hubby's favorite.... Simply his favorite tea break and supper snacks... Used to buy from the bakery, ever since I started baking, he has not really walked into the bakery.... 

Ingredients :
Flour
Butter
Baking powder
Sugar
Vanilla essence
Mixed fruits
Eggs

Digestive biscuit cupcakes

Most of us enjoying eating digestive biscuits as tea break.  I try to use it as one of the baking ingredient for this cupcake.  I added in some Oreo and chocolate chips... 

Overall was not that good because it turned out to be quite dry and after keeping till the next day, it become a bit hard... 

Tom Yam fried rice

The very first time when we tried this was when we were in Penang for holiday... Since then, my girl has been pestering me to cook this for her....

Very simple ingredients :
Prawns
Sotong
Chicken sausages
Eggs
Cabbages
Tomyam paste
Cooled rice


四大天王

When you visit any seafood restrurant in JB, you will definitely find this dish to be their "signboard" dish... 招牌菜.


Using petai (臭豆), long beans, egg plants & lady fingers... Of course, Sambal and dried shrimps.... 

Something very Malaysian, but in some parts of Singapore, they do sell this dish... It's something very simple and of course, its easy to prepare... Try it...


Pineapple upside down cake

Tried this, it was something very simple... The can pineapple rings were something very sweet... In order to make it balance and low sugar... The cake has to cut down on the sugar side... Overall, it is quite nice only thing is the cake become very moist after a while because of the juicy pineapple rings...

Oreo butter cake

Something very simple and yet it was successfully done... My 3 kids and my hubby simply finished it within a day... 

My very first ice cream cake (no bake)

Made this for my hubby's birthday... He was so surprised when we (the kids and I) presented it to him on his birthday.... A bit messy... But I was nice...

Cupcakes and cupcakes...

These cupcakes were so successful that my gal actually got me some orders from her school mates... In fact, my youngest boy school teachers also ordered from me.... 


The very first cookies I bake after so many years

The very first cookies that I baked... Not a nice one but my kids enjoy so so much... Need to improve ...


A New Journey To Bake

Baking has been my interest since secondary school days.... 

Due to family commitments after married, I have no choice but to stop baking.... 

After all these years, my kids grown up and I have more time to enjoy things I love... Baking is one of my dream...

I started baking cookies to cake and now, I have been enjoying baking bread...

Enjoy my journey and feel free to give me your comments.... Thank you...